Understanding Jammy Eggs
What Are Jammy Eggs?
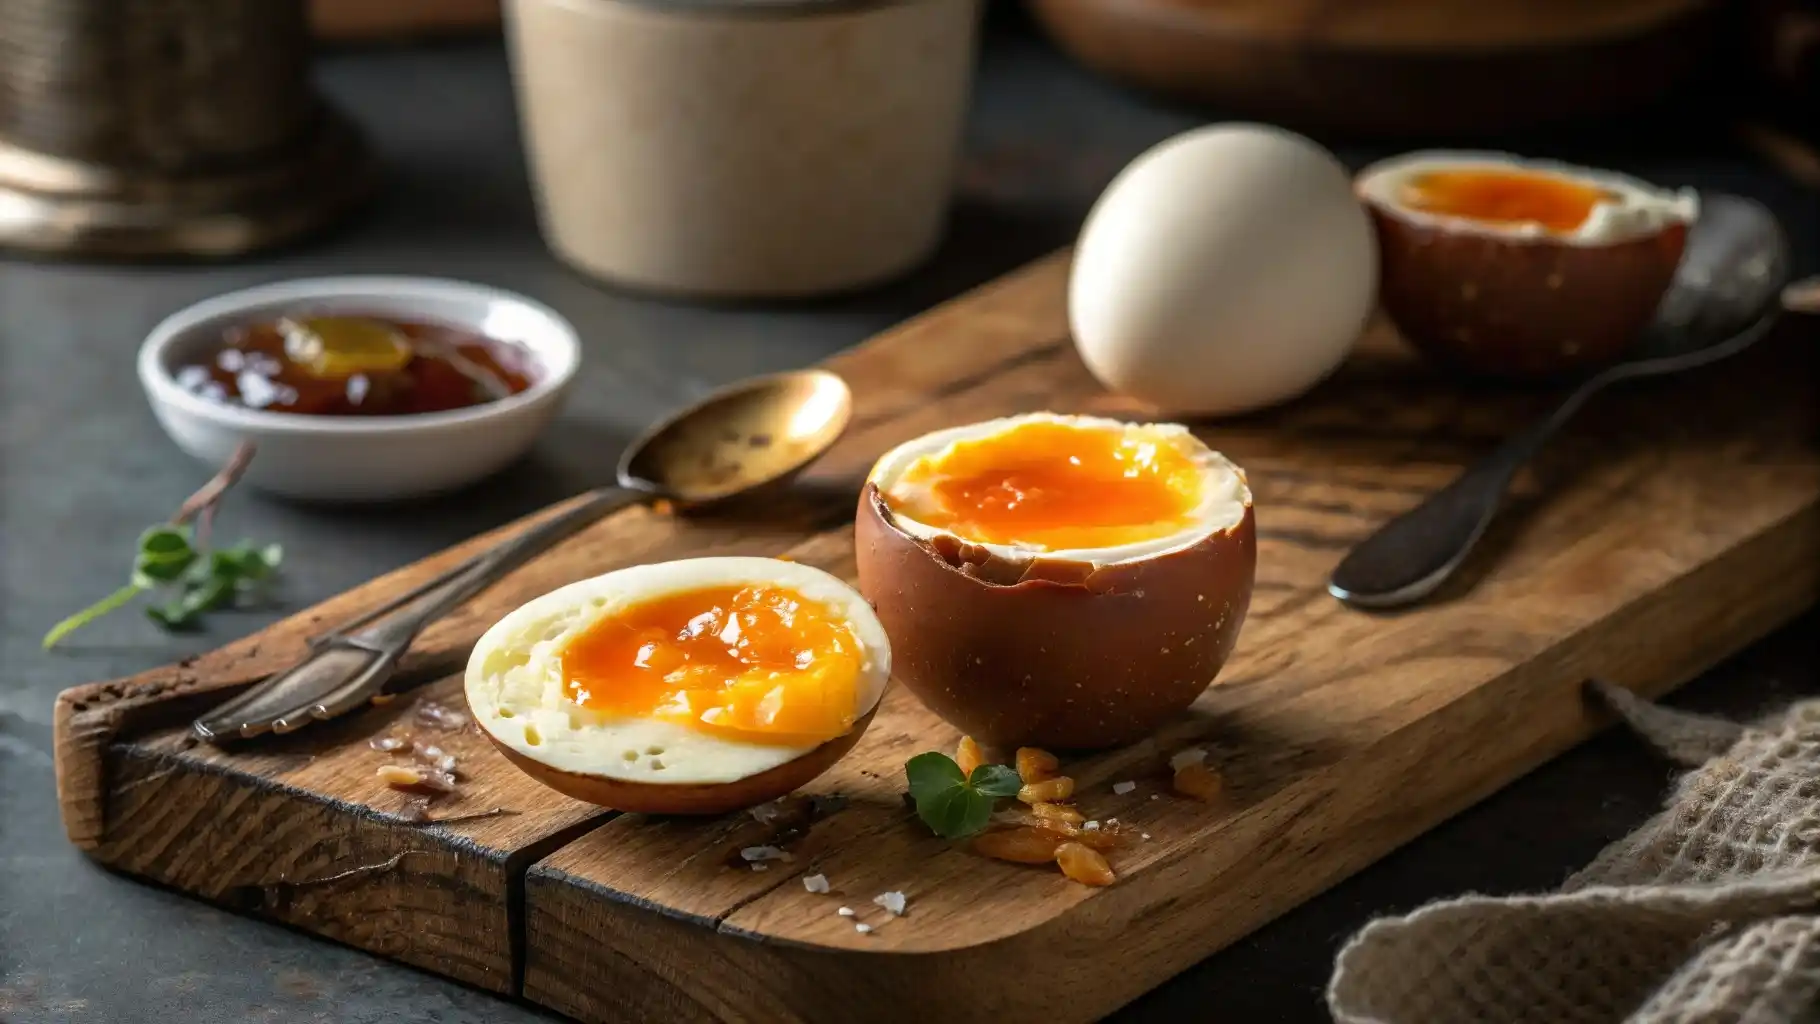
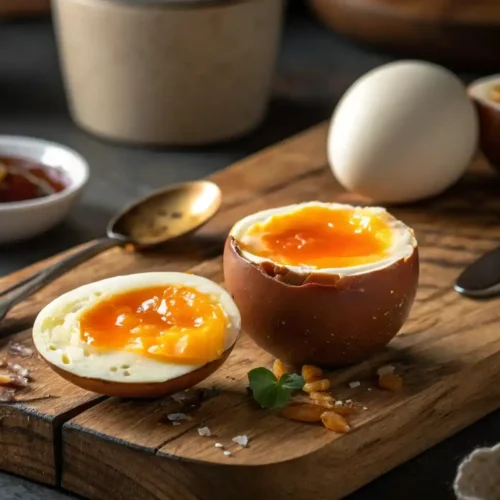
Jammy eggs occupy the perfect middle ground between soft-boiled and hard-boiled eggs. They feature fully set whites and yolks that have a custard-like, spreadable consistency—similar to jam, hence the name. This textural contrast creates an egg that’s versatile enough for countless dishes while delivering a luxurious mouthfeel that elevates everything from simple toast to elaborate rice bowls.
The Appeal of Jammy Yolks
The allure of jammy eggs lies in their perfect balance of texture and flavor. Unlike fully runny yolks that can be messy or hard-boiled yolks that can be chalky and dry, jammy yolks offer a concentrated egg flavor in a spreadable, rich consistency. The partially set yolk creates a natural sauce that adds creaminess and depth to any dish without the need for additional condiments. This ideal consistency also makes jammy eggs easier to transport and eat than their soft-boiled counterparts, making them perfect for meal prep and packed lunches.
Selecting the Right Eggs
Freshness Matters
For the best jammy eggs, freshness is crucial. As eggs age, the air pocket inside them expands, affecting cooking time and making them harder to peel. For optimal results, use eggs that are between 5-10 days old. Very fresh eggs, while excellent for poaching or frying, can be challenging to peel when boiled. You can test freshness by placing an egg in a bowl of water—if it lies flat on its side, it’s fresh; if it stands upright or floats, it’s older.
Size and Quality Considerations
Egg size directly impacts cooking time. Medium eggs will cook faster than large or extra-large eggs, so adjust your timing accordingly. For consistent results, use eggs of the same size in a single batch. Free-range or pasture-raised eggs often have deeper-colored yolks with better flavor and nutritional profiles. While the cooking method remains the same, the quality of your starting ingredients will affect the final taste and appearance of your jammy eggs.
Preparing for Perfection
Necessary Tools and Equipment
Creating perfect jammy eggs doesn’t require specialized equipment, but having the right tools makes the process foolproof:
- A saucepan with a tight-fitting lid
- A timer or stopwatch for precise timing
- A slotted spoon for gentle egg handling
- A bowl large enough for an ice bath
- Plenty of ice cubes
- Optional: an egg piercer to reduce cracking during cooking
For those who make jammy eggs regularly, consider investing in an egg steamer or an Instant Pot, which can produce consistent results with minimal monitoring.
The Importance of an Ice Bath
The ice bath is not just a suggestion—it’s essential for achieving the perfect jammy texture. Immediately transferring eggs from hot water to an ice bath accomplishes two critical things: it stops the cooking process instantly, preventing the yolks from cooking further, and it creates a temperature shock that helps separate the egg membrane from the shell, making peeling significantly easier. Prepare your ice bath before you start cooking and ensure it contains enough ice to stay cold even after adding hot eggs.
Step-by-Step Jammy Eggs Recipe
Boiling Method
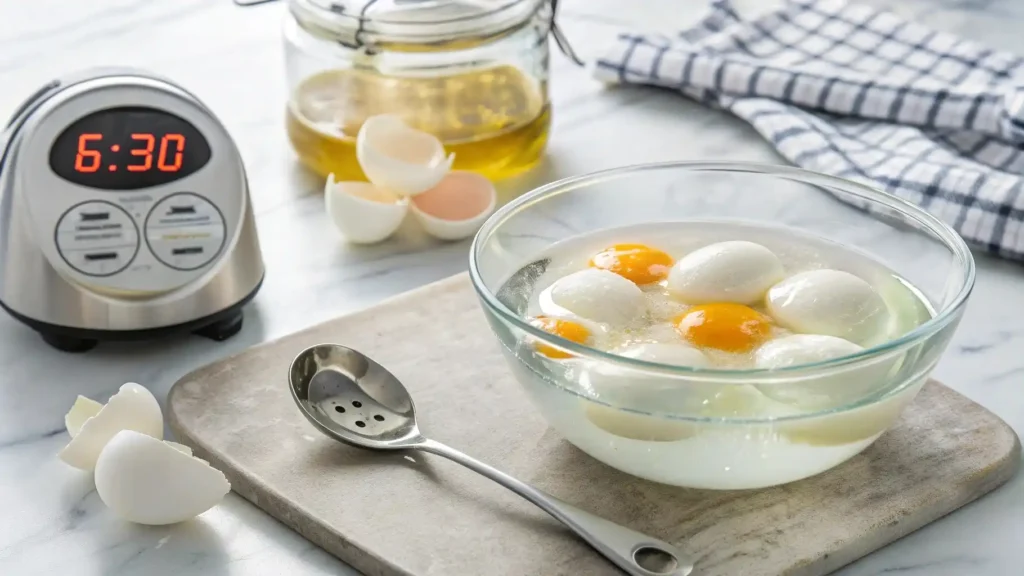
- Preparation: Remove eggs from refrigerator 20-30 minutes before cooking to reduce temperature shock. Prepare an ice bath in a large bowl.
- Water Temperature: Fill a saucepan with enough water to cover eggs by 1 inch. Bring to a rolling boil over high heat.
- Adding Eggs: Using a slotted spoon, gently lower room-temperature eggs into the boiling water. Immediately reduce heat to maintain a gentle simmer.
- Timing: For classic jammy eggs, cook large eggs for exactly 6 minutes and 30 seconds. For medium eggs, reduce to 6 minutes; for extra-large eggs, increase to 7 minutes.
- Cooling: As soon as the timer sounds, transfer eggs to the prepared ice bath using a slotted spoon. Let them cool for at least 5 minutes.
Steaming Method
- Setup: Add 1 inch of water to a pot with a steamer basket. Bring water to a boil.
- Cooking: Place eggs in the steamer basket (not touching the water). Cover and steam for 6 minutes and 45 seconds for large eggs.
- Cooling: Transfer immediately to an ice bath and cool for 5 minutes.
The steaming method offers more consistent results as it’s less affected by the number of eggs being cooked and provides gentler heat, reducing the risk of cracking.
Timing and Temperature Tips
- Altitude Adjustments: At higher elevations, water boils at lower temperatures. Add 30 seconds to 1 minute to your cooking time for every 1,000 feet above sea level.
- Starting Temperature: For more predictable results, start with room-temperature eggs. If using refrigerated eggs, add 30 seconds to your cooking time.
- Consistency is Key: Use the same pot, water level, and heat source each time to develop your perfect timing.
- The 6:30 Rule: For classic jammy eggs at sea level with large eggs, 6 minutes and 30 seconds is your target. Adjust from there based on your preferences—6 minutes for runnier yolks, 7 minutes for firmer but still jammy yolks.
Remember that carryover cooking occurs even after removing eggs from heat, which is why the ice bath is crucial for stopping the cooking process precisely when desired.
Peeling Techniques for Jammy Eggs
Cracking the Shell
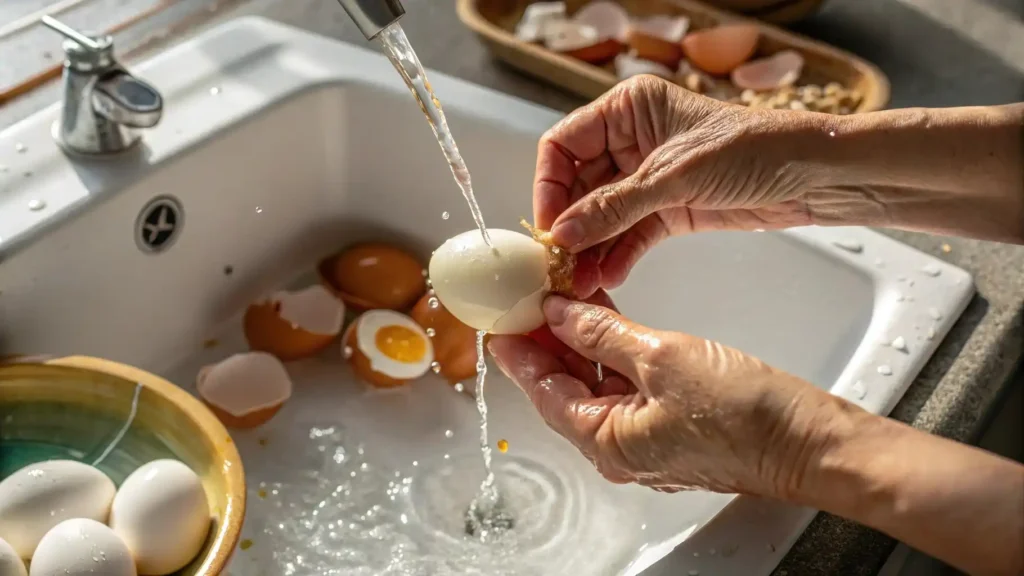
The key to easily peeled jammy eggs begins with proper cracking. After cooling in the ice bath:
- Gently tap the egg on a hard surface, creating cracks all around the shell.
- Start peeling from the wider end, where the air pocket is located.
- Look for the thin membrane between the shell and egg white—getting under this membrane is the secret to clean peeling.
For stubborn shells, roll the egg gently on a countertop under light pressure from your palm to create a network of fine cracks before peeling.
Peeling Under Water
Water is your ally when peeling jammy eggs. Try these techniques:
- Peel under running cold water, which helps flush away shell fragments and lubricates between the shell and egg.
- Alternatively, peel in a bowl of cold water, which allows you to see shell fragments more clearly.
- For batch preparation, place multiple cracked eggs in a container with cold water, seal, and gently shake to loosen shells before peeling.
Remember that eggs that are too fresh will be harder to peel regardless of technique. The ideal jammy egg is from one that’s been in your refrigerator for 5-10 days.
Serving Suggestions
Jammy Eggs in Salads
Jammy eggs transform everyday salads into satisfying meals:
- Classic Cobb Salad: Quarter jammy eggs and arrange them alongside avocado, bacon, and blue cheese over crisp lettuce.
- Niçoise Variation: Replace traditional hard-boiled eggs with jammy eggs for a luxurious twist on this French classic.
- Grain Bowls: Halve jammy eggs and place them atop quinoa or farro bowls with roasted vegetables and tahini dressing.
- Potato Salad Upgrade: Gently fold quartered jammy eggs into warm potato salad just before serving for a creamy textural contrast.
The jammy yolk acts as a natural, rich dressing when it mixes with other ingredients, often reducing the need for additional sauces.
On Toast or Bowls
Jammy eggs elevate simple carbohydrates into memorable meals:
- Avocado Toast: Layer sliced jammy eggs over mashed avocado on seeded toast, finishing with flaky salt and red pepper flakes.
- Ramen Enhancement: Place a halved jammy egg in homemade or even instant ramen for restaurant-quality presentation and flavor.
- Rice Bowls: Add jammy eggs to rice bowls with crispy vegetables and a drizzle of chili oil for a balanced meal.
- Breakfast Sandwich: Layer a sliced jammy egg with arugula and aioli on a toasted English muffin for an elevated breakfast sandwich.
For presentation, consider slicing eggs with a warm, sharp knife for the cleanest cut that showcases the perfect jammy yolk.
Perfect Jammy Eggs
Equipment
- 1 medium saucepan with lid
- 1 slotted spoon
- 1 large bowl for ice bath
- 1 timer or stopwatch
Ingredients
- 4 large eggs
- Water for boiling
- 2 cups ice cubes
- Cold water for ice bath
- 1/4 tsp salt optional, for easier peeling
Instructions
- Remove eggs from refrigerator 20-30 minutes before cooking to reduce temperature shock.
- Fill a medium saucepan with enough water to cover eggs by 1 inch. Add salt if desired. Bring to a rolling boil over high heat.
- Prepare an ice bath in a large bowl with ice cubes and cold water.
- Using a slotted spoon, gently lower room-temperature eggs into the boiling water.
- Immediately reduce heat to maintain a gentle simmer and start your timer for exactly 6 minutes and 30 seconds.
- When the timer goes off, immediately transfer eggs to the ice bath using a slotted spoon.
- Let eggs cool in the ice bath for at least 5 minutes to stop the cooking process.
- Gently tap each egg on a hard surface to crack the shell all over, then peel under cold running water, starting from the wider end.
- Serve immediately or refrigerate for up to 2 days.
Notes
- For medium eggs, reduce cooking time to 6 minutes.
- For extra-large eggs, increase cooking time to 7 minutes.
- Fresh eggs are harder to peel; eggs that are 7-10 days old work best.
- The ice bath is crucial for stopping the cooking process and making the eggs easier to peel.
- Store peeled jammy eggs in cold water in the refrigerator for up to 24 hours.
- For a firmer yolk, increase cooking time by 30 seconds; for a runnier yolk, decrease by 30 seconds.
Frequently Asked Questions
For the perfect jammy egg, large eggs should be boiled for exactly 6 minutes and 30 seconds. This timing creates fully set whites and yolks with a spreadable, jam-like consistency. For medium eggs, reduce the time to 6 minutes; for extra-large eggs, increase to 7 minutes. Remember that altitude, starting egg temperature, and the number of eggs being cooked can all affect timing, so you may need to adjust these times slightly based on your specific conditions.
The 5-5-5 rule is a method specifically designed for cooking eggs in a pressure cooker like an Instant Pot. It stands for:
1) 5 minutes to come to pressure
2) 5 minutes cooking time at high pressure
3) 5 minutes natural release before transferring to an ice bath
This method typically produces eggs that are between jammy and hard-boiled. For true jammy eggs in a pressure cooker, many enthusiasts adjust to a 5-4-5 rule, reducing the cooking time to 4 minutes while keeping the rest of the process the same.
Seven-minute eggs are eggs boiled for exactly 7 minutes, resulting in fully set whites and yolks that are slightly firmer than classic jammy eggs but still soft in the center. They’re often described as “medium-boiled” and represent the upper end of the jammy egg spectrum. Seven-minute eggs are easier to handle and slice cleanly while still maintaining some of the creamy texture that makes jammy eggs so appealing. They’re ideal for situations where you want a more structured egg that won’t spread as much when cut.
Conclusion: Mastering the Art of Jammy Eggs
Jammy eggs are a simple yet transformative addition to your culinary repertoire. With their custardy, velvety yolks and firm yet tender whites, they strike the perfect balance between soft-boiled and hard-boiled eggs.
Whether you’re topping a salad, enhancing a bowl of ramen, or enjoying them on toast, jammy eggs bring a touch of elegance and richness to any dish.
By understanding the importance of freshness, timing, and technique, you can consistently achieve the perfect jammy texture. Remember to use an ice bath to halt the cooking process and make peeling easier, and don’t be afraid to experiment with boiling or steaming methods to find what works best for you.